空间稀疏数据结构
note
Prerequisite: please read the Fields, Fields (advanced), and SNodes first.
 图:使用粒子及网格的三维流体仿真。 从左至右:粒子、1x1x1 体素、4x4x4 块、16x16x16 块。
动机
在大规模的空间计算中,例如物理建模、图形学和三维重建,经常用到高分辨率 2D/3D 网格。 然而,如果我们使用稠密数据结构, 这些网格会消耗大量内存空间和处理能力(见 field 和 field(进阶版))。 虽然编程人员可能会分配大规模稠密网格来存储空间数据(特别是物理量,如密度或速度场),他们可能只关心这个稠密网格中的一小部分,其他的部分可能表示空的空间(如真空或空气)。
为解释这一理念,下图稀疏网格中重要的区域只会占用整个边界盒的一小部分。 如果我们能够利用这种“空间稀疏性”,将计算的重点放在我们关心的区域,我们将节省大量的存储空间和算力。

note
The key to leveraging spatial sparsity is replacing dense grids with sparse grids.
以往,稀疏数据结构基于 四叉树(2D)和 八叉树(3D)。 考虑到在现代计算机架构中,解引用指针的成本相对较高, 四叉树和八叉树对性能的友好程度不如分支因子更大的浅层树,例如 VDB 和 SPGrid。 在 Taichi 中,你可以使用 SNode 组成类似于 VDB 和 SPGrid 的数据结构。 Taichi 的空间稀疏数据结构的优点包括:
- Access with indices, which just like accessing a dense data structure.
- 迭代时自动并行。
- 自动内存访问优化。
note
Backend compatibility: The LLVM-based backends (CPU/CUDA) offer the full functionality for performing computations on spatially sparse data structures. 在 Metal 后端,稀疏数据结构现在已被弃用。 对动态 SNode(dynamic SNode)的支持已在 v1.3.0 中移除,对指针(pointer)/位掩码(bitmasked)SNode 的支持将在 v1.4.0 中移除。
note
Sparse matrices are usually not implemented in Taichi via spatially sparse data structures. 请参阅 稀疏矩阵。
Taichi 中的空间稀疏数据结构
Taichi 中的空间稀疏数据结构由 pointer、bitmasked、dynamic,和 dense SNode 组成。 一个只由 dense SNode 组成的 SNode 树不是空间稀疏数据结构。
在空间稀疏数据结构中,如果一个像素、 体素或一个网格节点被分配参与计算,就认为它是活跃的。 网格其他部分就是未激活的。 用 SNode 术语解释,叶结点或中间单元是否激活用一个布尔值表示。 当且仅当一个单元活跃时,此单元的激活值为 True。 当写入未激活的单元格时,Taichi 会自动激活它。 Taichi 还提供对单元活跃度的手动操作:查看 显式操作和查询稀疏性。
note
Reading an inactive pixel returns zero.
指针 SNode
下面的代码片段创建了一个 8x8 大小的稀疏网格,其顶层是 4x4 的指针阵列(pointer.py 的第二行),每一个指针都指向一个 2x2 的稠密块。 就和稠密 field 一样,你可以使用索引来读写稀疏 field。 下图以绿色显示活跃的块和像素。
x = ti.field(ti.f32)
block = ti.root.pointer(ti.ij, (4,4))
pixel = block.dense(ti.ij, (2,2))
pixel.place(x)

@ti.kernel
def activate():
    x[2,3] = 1.0
    x[2,4] = 2.0

@ti.kernel
def print_active():
    for i, j in block:
        print("Active block", i, j)
    # output: Active block 1 1
    #         Active block 1 2
    for i, j in x:
        print('field x[{}, {}] = {}'.format(i, j, x[i, j]))
    # output: field x[2, 2] = 0.000000
    #         field x[2, 3] = 1.000000
    #         field x[3, 2] = 0.000000
    #         field x[3, 3] = 0.000000
    #         field x[2, 4] = 2.000000
    #         field x[2, 5] = 0.000000
    #         field x[3, 4] = 0.000000
    #         field x[3, 5] = 0.000000
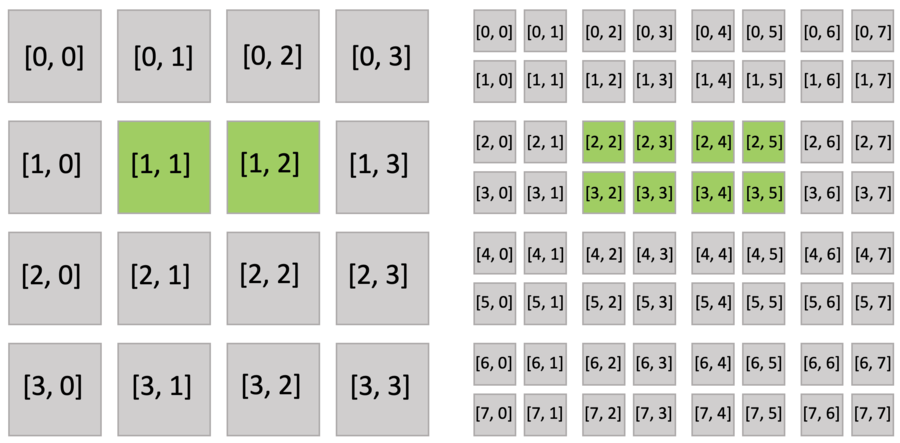
执行 activate() 函数自动激活 block[1,1],其中包括 x[2,3],和 block[1,2],其中包括 x[2,4]。 block[1,1](x[2,2], x[3,2], x[3,3])和 block[1,2](x[2,5], x[3,4], x[3,5])的其他像素也被隐式激活,因为稠密块中的所有像素共享相同的激活值。
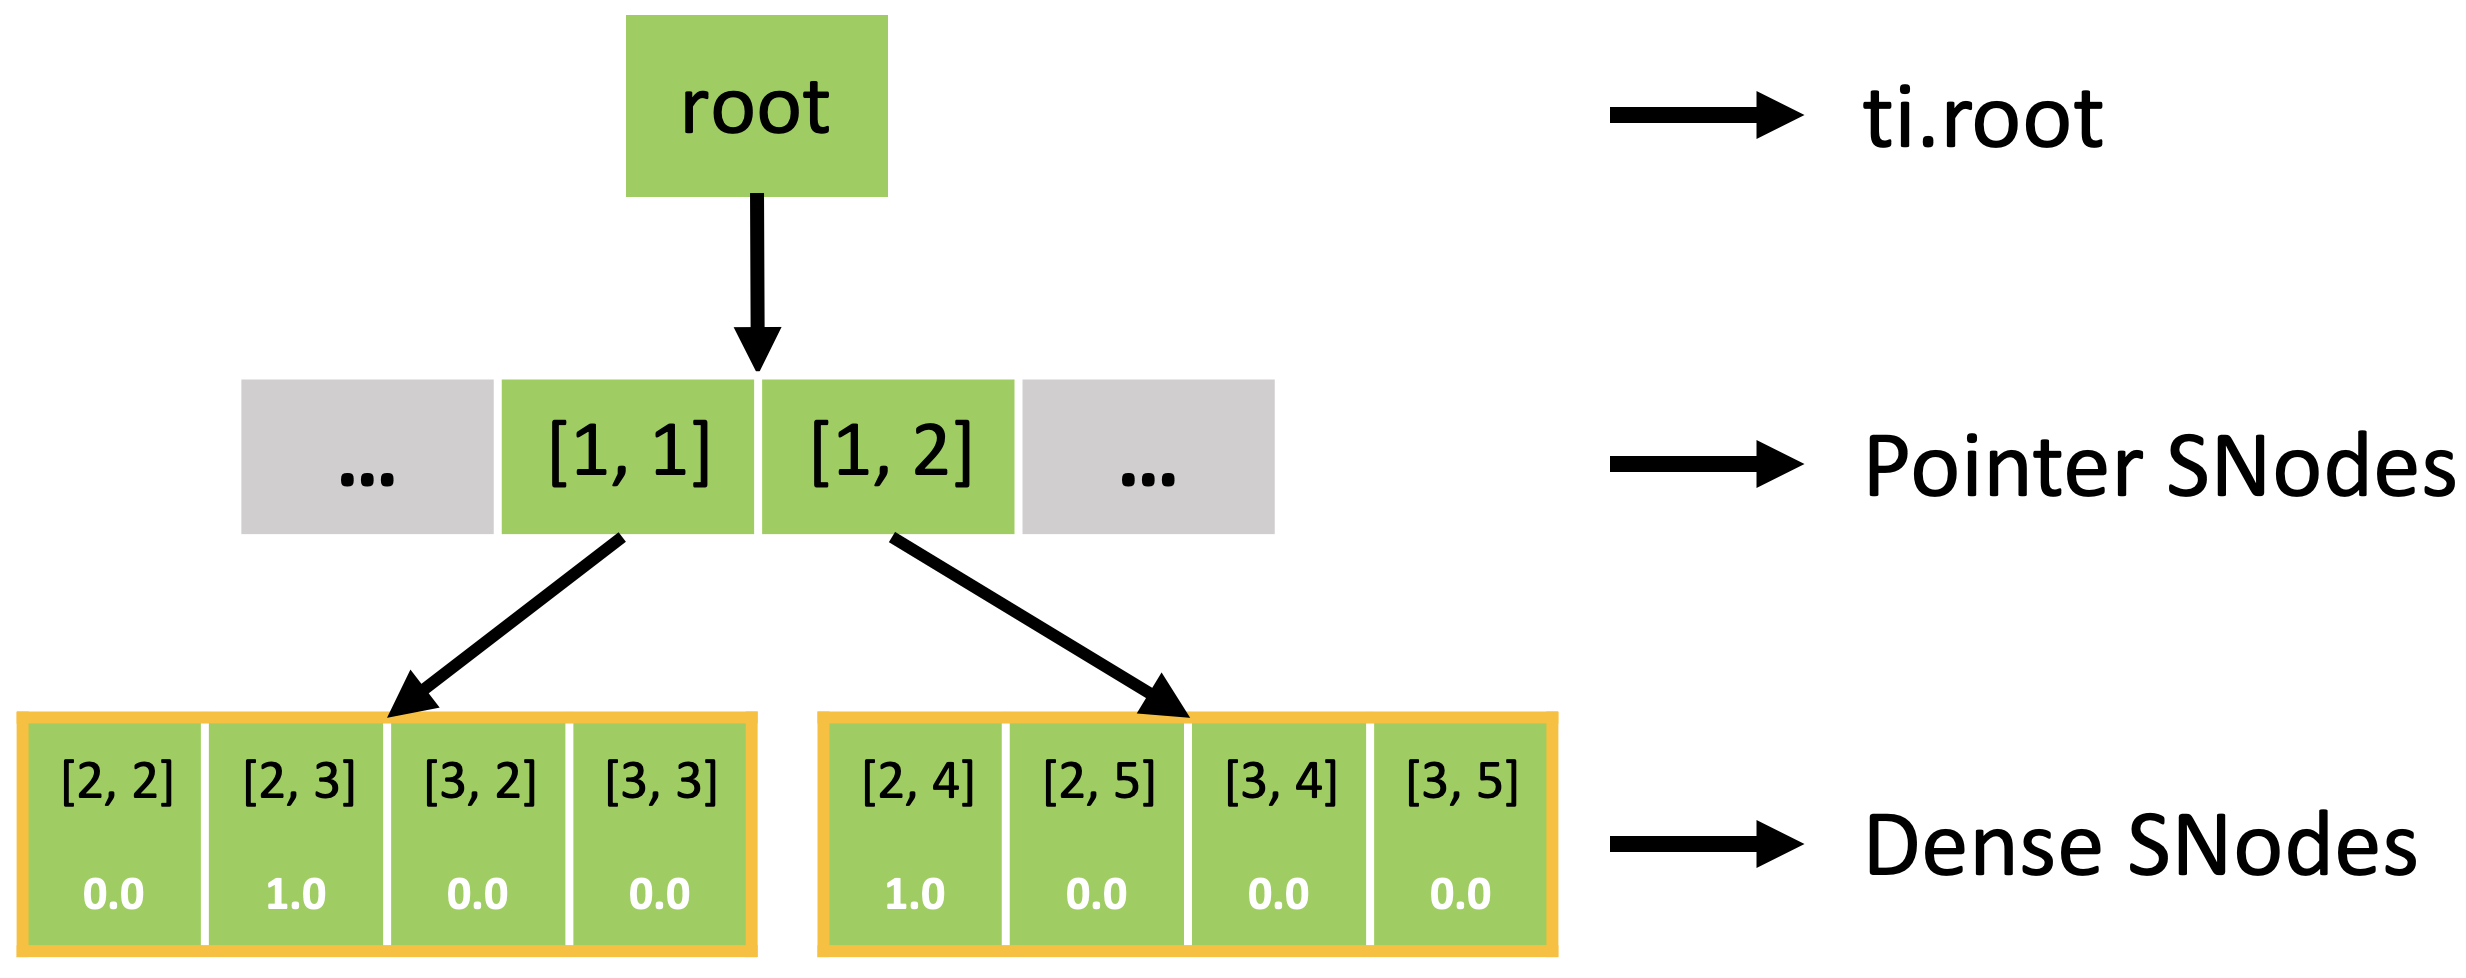
事实上,稀疏 field 是如下图所示的一棵 SNode 树。 你可以使用 for 循环来遍历 SNode 树的不同层级,就像上述例子里 print_active() 函数一样。 遍历一个块的并行循环 for i, j in block 将遍历所有活跃的 pointer SNode。 遍历一个像素的并行循环 for i, j in pixel 将遍历所有活跃的 dense SNode。
位掩码 SNode
虽然空指针可以很有效地表示空的子树,但是在叶节点使用 64 位来表示一个单独的像素的活跃状态会消耗过多的空间。
例如,如果每个像素包含单个的 f32 值(4 字节),一个 64 位指向该值的指针就需要占用 8 字节的空间。 指针的存储开销高于存储值本身所需要的空间,这种情况违背了我们使用空间稀疏数据结构来节省存储空间的目标。
为抵消指针的存储开销,你可以将像素按块排布,让指针直接指向块,就像 pointer.py 中定义的数据结构一样。
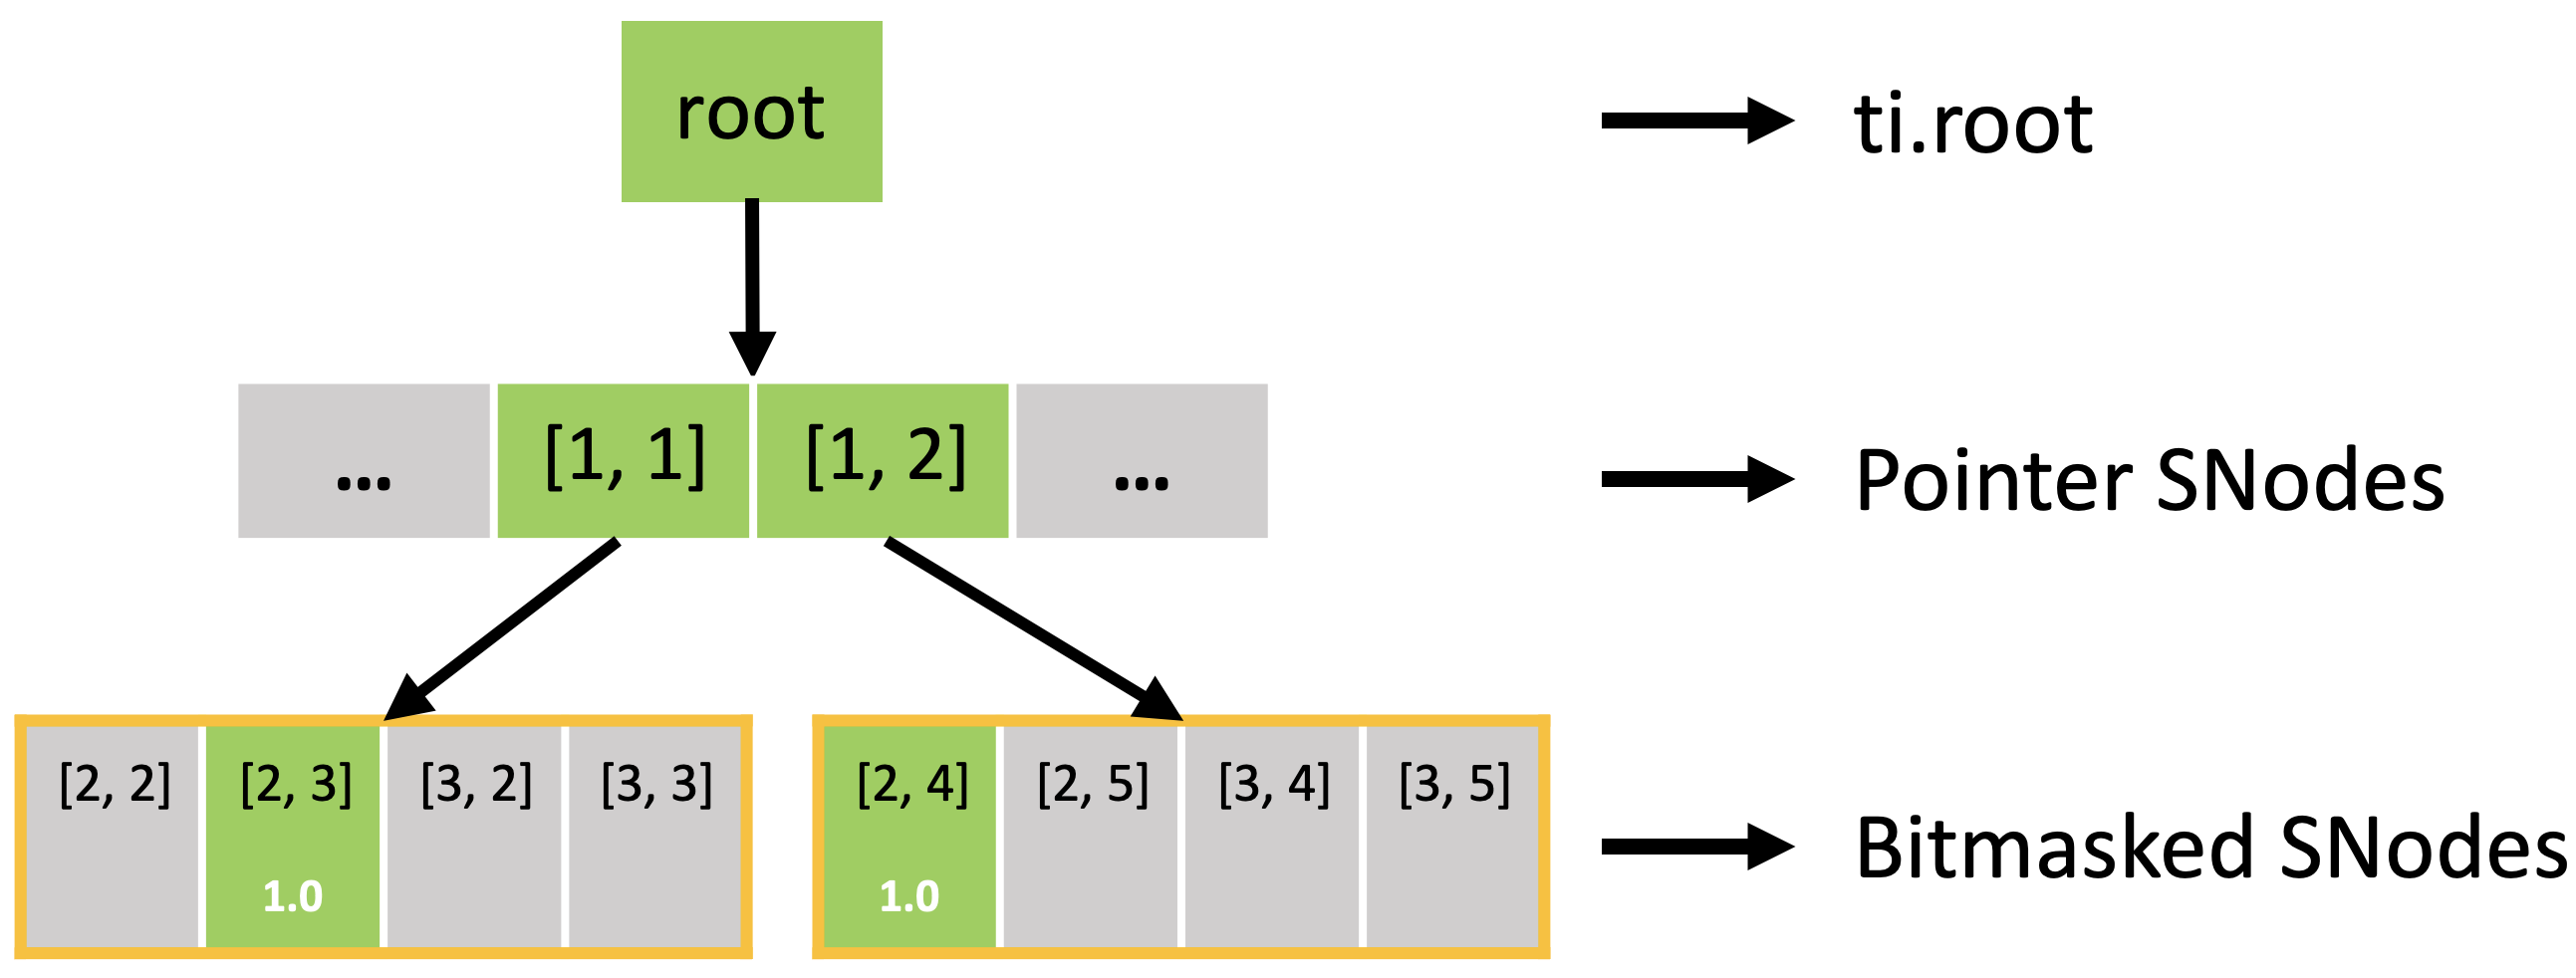
这种设计中需要注意的一点是,处于同一个 dense 块中的像素将不能再自由地改变其活跃状态。 而是拥有同一个活跃标识。 要解决这个问题,bitmasked SNode 额外为每像素分配 1 比特数据来表示每个像素的活跃状态。
下面的代码片段使用 8x8 网格解释了这个做法。 bitmasked.py 和 pointer.py 之间唯一的区别是,位掩码 SNode 取代了稠密 SNode(第 3 行)。
x = ti.field(ti.f32)
block = ti.root.pointer(ti.ij, (4,4))
pixel = block.bitmasked(ti.ij, (2,2))
pixel.place(x)

@ti.kernel
def activate():
    x[2,3] = 1.0
    x[2,4] = 2.0

@ti.kernel
def print_active():
    for i, j in block:
        print("Active block", i, j)
    for i, j in x:
        print('field x[{}, {}] = {}'.format(i, j, x[i, j]))
此外,活跃块与下面显示的 pointer.py 相同。 然而,块中的位掩码像素并非全部激活,因为每个像素都有一个激活值。
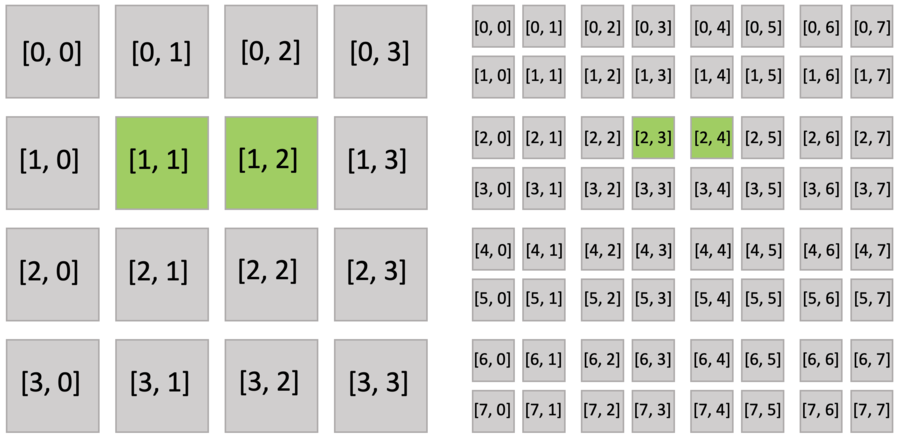
位掩码 SNode 就像带有辅助激活值的稠密 SNode。
动态 SNode
Taichi officially supports dynamic data structure Dynamic SNode since version v1.4.0. You can think of a dynamic SNode as a List that can only store data of a fixed type. The element types it supports include scalars, vectors/matrices, and structs. It also supports the following three APIs:
append: Dynamically adds an element, equivalent to theappendmethod of a Python list.deactivate: Clears all stored elements, equivalent to theclearmethod of a Python list.length: Gets the actual number of elements currently stored, equivalent to the__len__method of a Python list.
All three methods must be called inside the Taichi scope.
Unfortunately, Dynamic SNode does not support dynamically deleting elements like pop and remove. This is because it is difficult to implement these operations with high performance in parallel computing.
note
Here are a few rules you must obey when using Dynamic Snode:
Dynamic SNode can only be used in the CPU and CUDA backends.
A dynamic SNode must have one axis only, and the axis must be the last axis.
动态 SNode 下不可再放置其他 SNode。 换言之,动态 SNode 必须直接放置在 field 中。
沿着从动态 SNode 到 SNode 树根节点的路径,其他 SNode 不能 具有与动态 SNode 相同的轴。
For example, to declare a one-dimensional dynamic list x that stores integers, we can write:
S = ti.root.dynamic(ti.i, 1024, chunk_size=32)
x = ti.field(int)
S.place(x)
Let's explain the meaning of these three lines of code:
- In the first line of code,
ti.root.dynamicmeans that the direct parent node ofSisti.root. Generally, callingS = P.dynamic()for an SNodePmeans the direct parent node ofSin the Snode tree isP. Hence this operation specifies the position ofSin the SNode tree system. - The first parameter of the
dynamicfunction is the axis on whichSis located. This axis must be one-dimensional and cannot have been used by any parent node ofS. Here we use the axisti.i(equivalent toaxis=0in NumPy). - The second parameter of the dynamic function is the maximum length of
S. Since Dynamic SNode dynamically allocates memory as needed, it does not occupy space when there is no data. However, this maximum length also has an upper limit (the maximum value of 32-bit int type), so it is not possible to assign an astronomical number to it at will. It is also possible to add elements beyond this maximum length, and elements outside the range can also be accessed normally using subscripts, but we recommend keeping the size of the list within the maximum length range. - The third parameter
chunk_sizewill be explained later in this article. - After obtaining the Dynamic SNode
Sin this way, we declare an integer field variablex = ti.field(int), and then callS.place(x)to convertxinto a data structure described byS. Before callingplace,xcannot be used to store data; after callingplace,xcan be used as a mutable list of typeint.
For example, we can use the append method to add data to x, and call the length function to get the actual length of x. Both functions must be called inside the kernel:
@ti.kernel
def add_data():
    for i in range(1000):
        x.append(i)
        print(x.length())

add_data()
We can also call the deactivate method of x to clear the entire list, which is equivalent to restoring x to its uninitialized state:
@ti.kernel
def clear_data():
    x.deactivate()
    print(x.length())  # will print 0
Returning to the explanation of the chunk_size parameter: the implementation of Dynamic SNode internally uses linked lists, where multiple elements are densely packed into a node (or "chunk") of the linked list, with each chunk containing chunk_size elements. Element allocation and deallocation are performed in units of chunks. The following diagram illustrates how x is laid out in memory (with k = 32):

Thus, the actual number of chunks allocated is ceil(x.length() / chunk_size).
We can also define more complex variable-length lists. For example, the following code defines an array x of length n = 10, where each element of x is a one-dimensional variable-length list:
S = ti.root.dense(ti.i, 10).dynamic(ti.j, 1024, chunk_size=32)
x = ti.field(int)
S.place(x)
Here, ti.root.dense(ti.i, 10) is a Dense SNode that represents a dense array of length 10 along the ti.i axis. S = ti.root.dense(ti.i, 10).dynamic(ti.j, ...) represents a child node of this Dense SNode, occupying the ti.j axis (which is different from the parent node!). The layout of x in memory is illustrated in the following diagram:
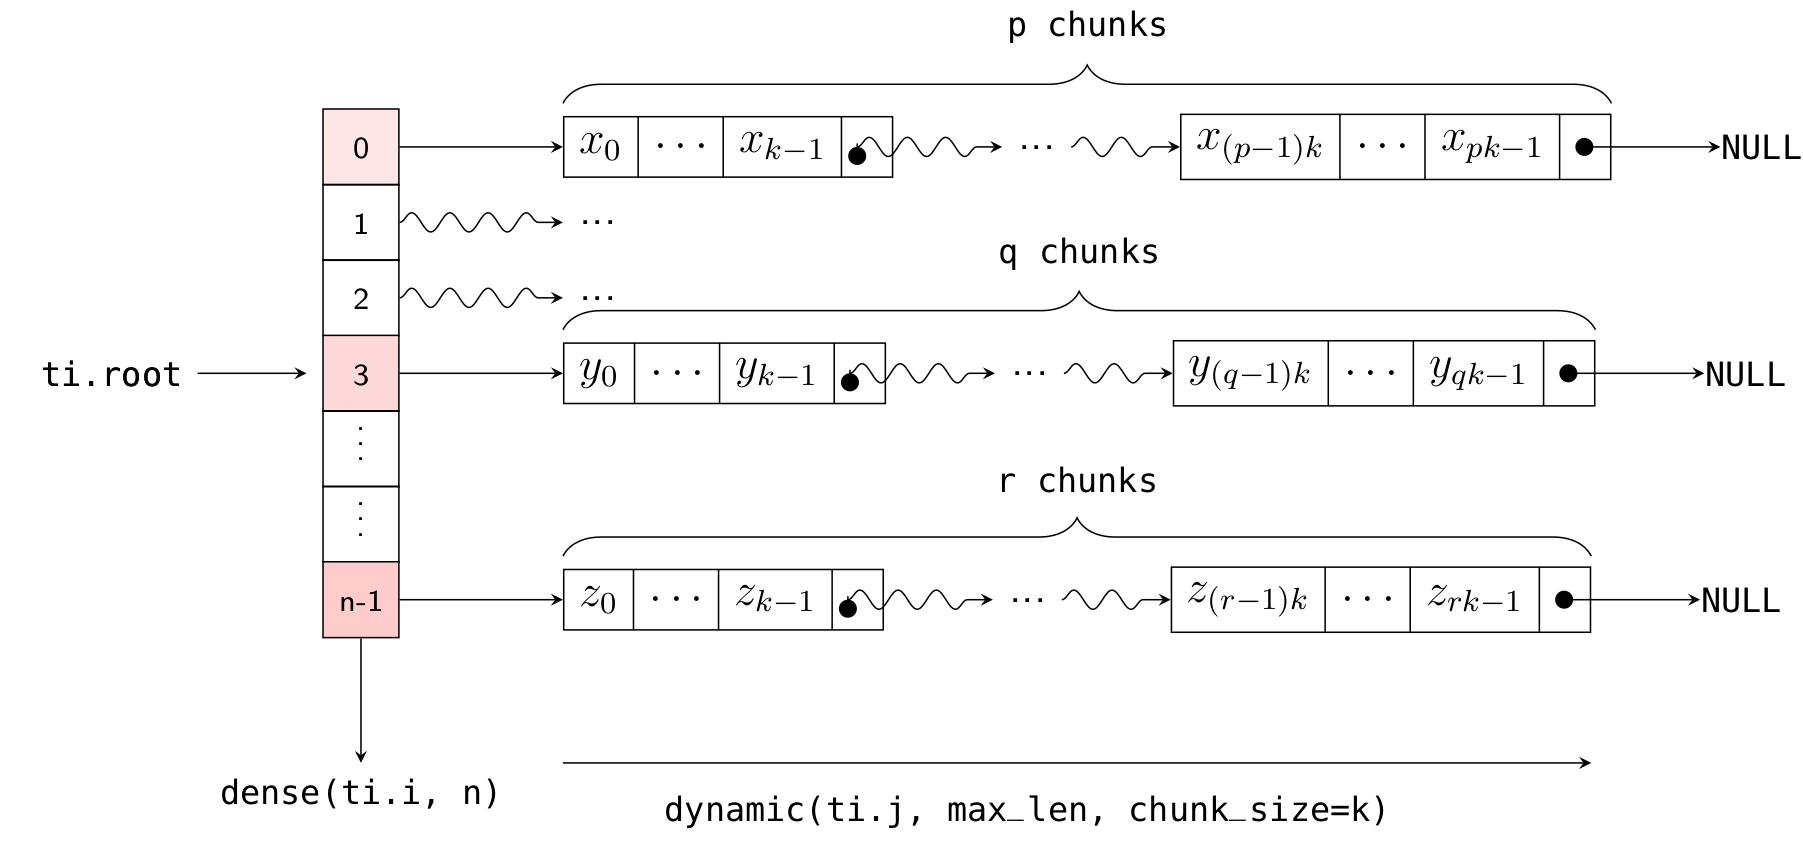
As with the one-dimensional case, you can dynamically add elements to the i-th list using x[i].append(), get the current length of the i-th list using x[i].length(), and clear the ith list using x[i].deactivate().
@ti.kernel
def add_data():
    for i in range(10):
        for j in range(i):
            x[i].append(j)
        print(x[i].length())  # will print i

    for i in range(10):
        x[i].deactivate()
        print(x[i].length())  # will print 0
All of the above discussion applies to using Dynamic SNode with other numeric types. For vector/matrix and struct types, the steps are identical. For example, consider the following code using struct types:
S = ti.root.dynamic(ti.i, 1024, chunk_size=32)
SphereType = ti.types.struct(center=ti.math.vec3, radius=float)
x = SphereType.field()
S.place(x)
Here, x is a one-dimensional variable-length list that can store values of type SphereType.
空间稀疏数据结构的计算
稀疏的结构 for 循环
在不规则的稀疏网格上进行有效的循环是非常具有挑战性的,尤其是在如 GPU 等并行设备上。 在 Taichi, for 循环具有对空间稀疏数据结构的原生支持,并且通过高效的自动并行机制,只遍历当前活跃的像素。
显式操作和查询稀疏性
Taichi 还提供可以显示操作数据结构稀疏性的 API。 你可以手动检查 SNode 的活跃度,激活 SNode,或者使 SNode 失活。 我们现在基于如下定义的 field 来说明这些功能。
x = ti.field(dtype=ti.i32)
block1 = ti.root.pointer(ti.ij, (3, 3))
block2 = block1.pointer(ti.ij, (2, 2))
pixel = block2.bitmasked(ti.ij, (2, 2))
pixel.place(x)
1. 活跃度检查
使用 ti.is_active(snode, [i, j, ...]) 来显式查询 snode[i, j, ...] 是否活跃。
@ti.kernel
def activity_checking(snode: ti.template(), i: ti.i32, j: ti.i32):
    print(ti.is_active(snode, [i, j]))

for i in range(3):
    for j in range(3):
        activity_checking(block1, i, j)
for i in range(6):
    for j in range(6):
        activity_checking(block2, i, j)
for i in range(12):
    for j in range(12):
        activity_checking(pixel, i, j)
2. 激活
使用 ti.activate(snode, [i, j, ...]) 显式激活 snode[i, j, ...] 的一个单元。
@ti.kernel
def activate_snodes():
    ti.activate(block1, [1, 0])
    ti.activate(block2, [3, 1])
    ti.activate(pixel, [7, 3])

activity_checking(block1, 1, 0) # output: 1
activity_checking(block2, 3, 1) # output: 1
activity_checking(pixel, 7, 3)  # output: 1

3. 失活
- 使用
ti.deactivate(snode, [i, j, ...])显式让snode[i, j, ...]的一个单元转为不活跃。 - 使用
snode.deactivate_all()来取消激活 SNodesnode的所有单元。 这个操作也会递归地使其所有的子节点不再活跃。 - 使用
ti.disactivate_all_snodes()来取消激活所有稀疏 SNode 的所有单元。
当取消激活发生时,Taichi 运行时将自动回收并使用 0 来填充不再活跃的容器的内存。
note
For performance reasons, ti.activate(snode, index) only activates snode[index]. 编程人员必须确保 snode[index] 的所有祖先容器已经激活。 否则,此操作会引起未定义的行为。
类似地,ti.disactivate...
- 不会递归取消激活一个单元的所有后代。
- 不会触发取消激活其父容器,即使父容器的所有子容器都已取消激活。
4. 祖先索引查询
使用 ti.rescale_index(descendant_snode/field, ancestor_snode, index) 来计算给定的后代索引的祖先索引。
print(ti.rescale_index(x, block1, ti.Vector([7, 3]))) # output: [1, 0]
print(ti.rescale_index(x, block2, [7, 3]))            # output: [3, 1]
print(ti.rescale_index(x, pixel,  [7, 3]))            # output: [7, 3]
print(ti.rescale_index(block2, block1, [3, 1]))       # output: [1, 0]
在第 1 行,你也可以根据给定的 pixel 索引 [7, 3],计算 block1 索引,即 [7//2//2, 3//2//2]。 然而,这样做将使计算代码和数据结构的内部配置(在这种情况下,block1 容器的大小)耦合。 使用 ti.rescale_index(),你可以避免硬编码数据结构的内部信息。
扩展阅读
请阅读这篇 SIGGRAPH Asia 2019 论文,或观看 介绍视频,同时查看 幻灯片 来了解更多关于空间稀疏数据结构的计算的信息。
Taichi elements 是一个在 Taichi 稀疏网格上实现的高性能 MLS-MPM 求解器。